No matter whether you are a system admin or a mere enthusiast,
chances are you need to work with text documents often. Linux, like
other Unices’, provides some of the best text manipulation
utilities for the end-users. The sed command-line utility is one
such tool that makes text processing far more convenient and
productive. If you’re a seasoned user, you should already know
about sed. However, beginners often feel that learning sed requires
extra hard work and thus refrain from using this mesmerizing tool.
That’s why we have undertaken the liberty to produce this guide and
help them learn the basics of sed as easily as possible.
Useful SED Commands for Newbie
Users
Sed is one of the three widely used filtering utilities
available in Unix, the others being “grep and awk”. We have already
covered the Linux grep command and awk command for beginners. This guide
aims to wrap up the sed utility for novice users and make them
adept at text processing using Linux and other Unices.[1]
How SED Works: A Basic
Understanding
Before delving into the examples directly, you should have a
concise understanding of how sed works in general. Sed is a stream
editor, built on top of the ed utility[2]. It allows us to make
editing changes to a stream of textual data. Although we can use a
number of Linux text editors[3]
for editing, sed allows for something more convenient.
You can use sed to transform text or filter out essential data
on the fly. It adheres to the core Unix philosophy by performing
this specific task very well. Moreover, sed plays very well with
standard Linux terminal tools and commands. Thus, it is more
suitable for a lot of tasks over traditional text editors.

At its core, sed takes some input, performs some manipulations,
and spit out the output. It does not change the input but simply
shows the result in the standard output. We can easily make these
changes permanent by either I/O redirection or modifying the
original file. The basic syntax of a sed command is shown
below.
sed [OPTIONS] INPUT
sed 'list of ed commands' filename
The first line is the syntax shown in the sed manual. The second
one is easier to understand. Don’t worry if you aren’t familiar
with ed commands right now. You’ll learn them throughout this
guide.
1. Substituting Text
Input
The substitute command is the most widely used feature of sed
for a lot of users. It allows us to replace a portion of text with
other data. You will very often use this command for processing
textual data. It works like the following.
$ echo 'Hello world!' | sed 's/world/universe/'
This command will output the string ‘Hello universe!’. It has
four basic parts. The ‘s’ command denotes the
substitution operation, /../../ are delimiters, the first portion
within the delimiters is the pattern that needs to be changed, and
the last portion is the replacement string.
2. Substituting Text Input from
Files
Let us first create a file using the following.
$ echo 'strawberry fields forever...' >> input-file
$ cat input-file
Now, say we want to replace strawberry with blueberry. We can do
so using the following simple command. Note the similarities
between the sed portion of this command and the above one.
$ sed 's/strawberry/blueberry/' input-file
We’ve simply added the filename after the sed portion. You may
also output the contents of the file first and then use sed to edit
the output stream, as shown below.
$ cat input-file | sed 's/strawberry/blueberry/'
3. Saving Changes to
Files
As we’ve already mentioned, sed doesn’t change the input data at
all. It simply shows the transformed data to the standard output,
which happens to be the Linux terminal[4]
by default. You can verify this by running the following
command.
$ cat input-file
This will display the original content of the file. However, say
you want to make your changes permanent. You can do this in
multiple ways. The standard method is to redirect your sed output
to another file. The next command saves the output of the earlier
sed command to a file named output-file.
$ sed 's/strawberry/blueberry/' input-file >> output-file
You can verify this by using the following command.
$ cat output-file
4. Saving Changes to Original
File
What if you wanted to save the output of sed back to the
original file? It’s possible to do so using the -i
or –in-place option of this tool. The below
commands demonstrate this using appropriate examples.
$ sed -i 's/strawberry/blueberry' input-file
$ sed --in-place 's/strawberry/blueberry/' input-file
Both of these above commands are equivalent, and they write the
changes made by sed back to the original file. However, if you are
thinking of redirecting the output back to the original file, it
will not work as expected.
$ sed 's/strawberry/blueberry/' input-file > input-file
This command will not work and result
in an empty input-file. This is because the shell performs the
redirect before executing the command itself.
5. Escaping
Delimiters
Many conventional sed examples use the ‘/’ character as their
delimiters. However, what if you wanted to replace a string that
contains this character? The below example illustrates how to
replace a filename path using sed. We’ll need to escape the ‘/’
delimiters using the backslash character.
$ echo '/usr/local/bin/dummy' >> input-file
$ sed 's/\/usr\/local\/bin\/dummy/\/usr\/bin\/dummy/' input-file > output-file
Another easy wat to escape delimiters is to use a different
metacharacter. For example, we could use ‘_’ instead of ‘/’ as the
delimiters to the substitution command. It’s perfectly valid since
sed doesn’t mandate any specific delimiters. The ‘/’ is used by
convention, not as a requirement.
$ sed 's_/usr/local/bin/dummy_/usr/bin/dummy/_' input-file
6. Substituting Every Instance of
A String
One interesting characteristic of the substitution command is
that, by default, it will only replace a single instance of a
string on each line.
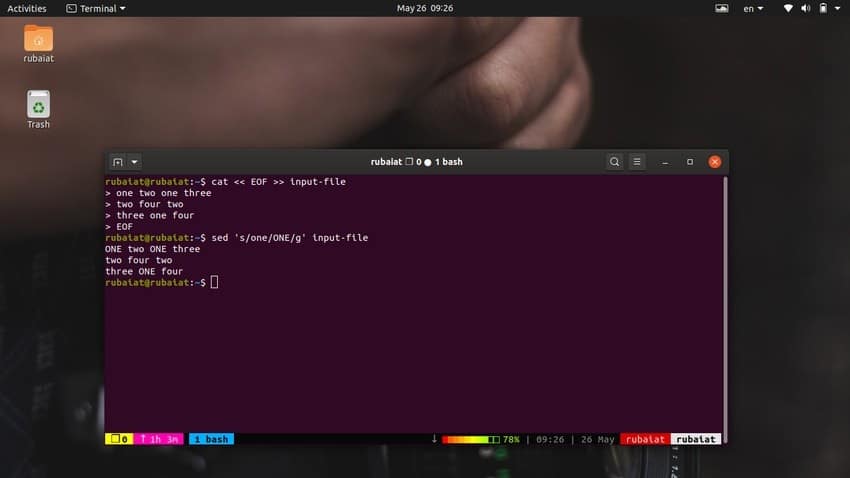
$ cat << EOF >> input-file
one two one three
two four two
three one four
EOF
This command will replace the contents of input-file with some
random numbers in a string format. Now, look at the below
command.
$ sed 's/one/ONE/' input-file
As you should see, this command only replaces the first
occurrence of ‘one’ in the first line. You need to use global
substitution in order to replace all occurrences of a word using
sed. Simply add a ‘g’ after the final delimiter of
‘s‘.
$ sed 's/one/ONE/g' input-file
This will substitute all occurrences of the word ‘one’
throughout the input stream.
7. Using Matched
String
Sometimes users may want to add certain things like parenthesis
or quotes around a specific string. This is easy to do if you know
exactly what you’re looking for. However, what if we don’t know
exactly what we will find? The sed utility provides a nice little
feature for matching such string.
$ echo 'one two three 123' | sed 's/123/(123)/'
Here, we are adding parenthesis around the 123 using the sed
substitution command. However, we can do this for any string in our
input stream by using the special metacharacter &,
as illustrated by the following example.
$ echo 'one two three 123' | sed 's/[a-z][a-z]*/(&)/g'
This command will add parenthesis around all lowercase words in
our input. If you omit the ‘g’ option, sed will do
so for only the first word, not all of them.
8. Using Extended Regular
Expressions
In the above command, we have matched all lowercase words using
the regular expression [a-z][a-z]*. It matches one or more
lowercase letters. Another way to match them would be to use the
metacharacter ‘+’. This is an example of extended
regular expressions. Thus, sed won’t support them by default.
$ echo 'one two three 123' | sed 's/[a-z]+/(&)/g'
This command doesn’t work as intended since sed doesn’t support
the ‘+’ metacharacter out of the box. You need to
use the options -E or -r to
enable extended regular expressions in sed.
$ echo 'one two three 123' | sed -E 's/[a-z]+/(&)/g'
$ echo 'one two three 123' | sed -r 's/[a-z]+/(&)/g'
9. Performing Multiple
Substitutions
We can use more than one sed command at a single go by
separating them by ‘;’ (semicolon). This is very
useful since it allows the user to create more robust command
combinations and reduce extra hassle on the fly. The following
command shows us how to substitute three strings at one go using
this method.
$ echo 'one two three' | sed 's/one/1/; s/two/2/; s/three/3/'
We have used this simple example to illustrate how to perform
multiple substitutions or any other sed operations for that
matter.
10. Substituting Case
Insensitively
The sed utility allows us to replace strings in a case
insensitive way. First, let us see how sed performs the following
simple replacement operation.
$ echo 'one ONE OnE' | sed 's/one/1/g' # replaces single one
The substitution command can only match one instance of ‘one’
and thus replace it. However, say we want it to match all
occurrences of ‘one’, irrespective of their case. We can tackle
this by using the ‘i’ flag of the sed substitution operation.
$ echo 'one ONE OnE' | sed 's/one/1/gi' # replaces all ones
11. Printing Specific
Lines
We can view a specific line from the input by using the
‘p’ command. Let us add some more text to our
input-file and demonstrate this example.
$ echo 'Adding some more
text to input file
for better demonstration' >> input-file
Now, run the following command to see how to print a specific
line using ‘p’.
$ sed '3p; 6p' input-file
The output should contain the line number three and six twice.
This is not what we expected, right? This happens because, by
default, sed outputs all lines of the input stream, as well as the
lines, asked specifically. To print only the specific lines, we
need to suppress all other outputs.
$ sed -n '3p; 6p' input-file
$ sed --quiet '3p; 6p' input-file
$ sed --silent '3p; 6p' input-file
All of these sed commands are equivalent and prints only the
third and sixth lines from our input file. So, you can suppress
unwanted output by using one of -n,
–quiet, or –silent options.
12. Printing Range of
Lines
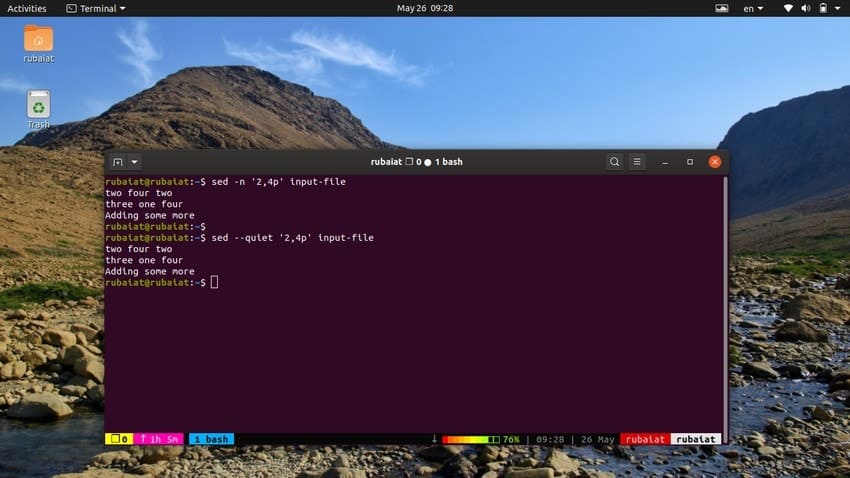
The below command will print a range of lines from our input
file. The symbol ‘,’ can be used for
specifying a range of input for sed.
$ sed -n '2,4p' input-file
$ sed --quiet '2,4p' input-file
$ sed --silent '2,4p' input-file
all of these three commands are equivalent as well. They will
print the lines two to four of our input file.
13. Printing Non-Consecutive
Lines
Suppose you wanted to print specific lines from your text input
using a single command. You can handle such operations in two ways.
The first one is to join multiple print operations using the
‘;’ separator.
$ sed -n '1,2p; 5,6p' input-file
This command prints the first two lines of input-file followed
by the last two lines. You can also do this by using the
-e option of sed. Notice the differences in the
syntax.
$ sed -n -e '1,2p' -e '5,6p' input-file
14. Printing Every N-th
Line
Say we wanted to display every second line from our input file.
The sed utility makes this very easy by providing the tilde
‘~’ operator. Take a quick look at the following
command to see how this works.
$ sed -n '1~2p' input-file
This command works by printing the first line followed by every
second line of the input. The following command prints out the
second line followed by every third line from the output of a
simple ip command.
$ ip -4 a | sed -n '2~3p'
15. Substituting Text Within a
Range
We can also replace some text only within a specified range the
same way we printed it. The below command demonstrates how to
substitute the ‘ones’s with 1’s in the first three lines of our
input-file using sed.
$ sed '1,3 s/one/1/gi' input-file
This command will leave any other ‘one’s unaffected. Add some
lines containing one to this file and try to check it for
yourself.
16. Deleting Lines from
Input
The ed command ‘d’ allows us to delete specific
lines or range of lines from text stream or from input files. The
following command demonstrates how to delete the first line from
the output of sed.
$ sed '1d' input-file
Since sed only writes to the standard output, this deletion is
not going to reflect on the original file. The same command can be
used to delete the first line from a multiline text stream.
$ ps | sed '1d'
So, by simply using the ‘d’ command after the
line address, we can suppress the input for sed.
17. Deleting Range of Lines from
Input
It is also very easy to delete a range of lines by using the ‘,’
operator alongside the ‘d’ option. The next sed
command will suppress the first three lines from our
input-file.
$ sed '1,3d' input-file
We can also delete non-consecutive lines by using one of the
following commands.
$ sed '1d; 3d; 5d' input-file
This command displays the second, fourth, and last line from our
input-file. The following command omits some arbitrary lines from
the output of a simple Linux ip command.
$ ip -4 a | sed '1d; 3d; 4d; 6d'
18. Deleting the Last
Line
The sed utility has a simple mechanism that allows us to delete
the last line from a text stream or an input file. It is the
‘$’ symbol and can be also used for other types of
operations alongside deletion. The following command deletes the
last line from the input file.
$ sed '$d' input-file
This is very useful since often we might know the number of
lines beforehand. This works in a similar way for pipeline
inputs.
$ seq 3 | sed '$d'
19. Deleting All Lines Except
Specific Ones
Another handy sed deletion example is to delete all lines except
the ones that are specified in the command. This is useful for
filtering out essential information from text streams or output of
other Linux terminal commands[5].
$ free | sed '2!d'
This command will output only the memory usage, which happens to
be on the second line. You can also do the same with input files,
as demonstrated below.
$ sed '1,3!d' input-file
This command deletes every line except the first three from
input-file.
20. Adding Blank
Lines
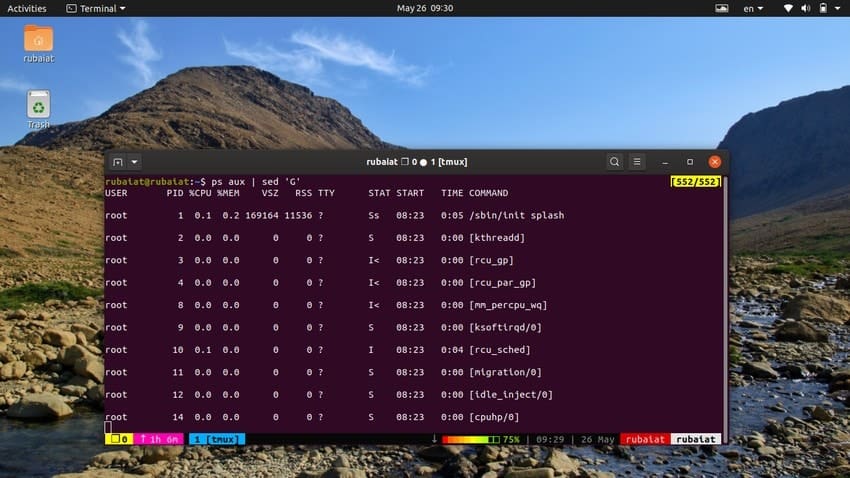
Sometimes the input stream might be too concentrated. You can
use the sed utility to add blank lines between the input in such
cases. The next example adds a blank line between every line of the
output of the ps command.
$ ps aux | sed 'G'
The ‘G’ command adds this blank line. You may
add multiple blank lines by using more than one
‘G’ command for sed.
$ sed 'G; G' input-file
The following command shows you how to add a blank line after a
specific line number. It will add a blank line after the third line
of our input-file.
$ sed '3G' input-file
21. Substituting Text on Specific
Lines
The sed utility allows users to substitute some text on a
particular line. This is useful in a number of different scenarios.
Let’s say we want to replace the word ‘one’ on the third line of
our input file. We can use the following command to do this.
$ sed '3 s/one/1/' input-file
The ‘3’ before the beginning of the
‘s’ command specifies that we only want to replace
the word that is found on the third line.
22. Substituting the N-th Word of
a String
We can also use the sed command to replace the n-th occurrence
of a pattern for a given string. The following example illustrates
this using a single one-line example in bash.
$ echo 'one one one one one one' | sed 's/one/1/3'
This command will replace the third ‘one’ with the number 1.
This works the same way for input files. The below command
substitutes the last ‘two’ from the second line of the
input-file.
$ cat input-file | sed '2 s/two/2/2'
We are first selecting the second line and then specifying which
occurrence of the pattern to change.
23. Adding New Lines
You can easily add new lines to the input stream by using the
command ‘a’. Check out the simple example below to
see how this works.
$ sed 'a new line in input' input-file
The above command will append the string ‘new line in input’
after each line of the original input-file. However, this might not
what you intended. You can add new lines after a specific line by
using the following syntax.
$ sed '3 a new line in input' input-file
24. Inserting New
Lines
We can also insert lines instead of appending them. The below
command inserts a new line before each line of input.
$ seq 5 | sed 'i 888'
The ‘i’ command causes the string 888 to be
inserted before each line of the output of seq. To insert a line
before a specific input line, use the following syntax.
$ seq 5 | sed '3 i 333'
This command will add the number 333 before the line that
actually contains three. These are simple examples of line
insertion. You can easily add strings by matching lines using
patterns.
25. Changing Input
Lines
We can also change the lines of an input stream directly using
the ‘c’ command of the sed utility. This is useful
when you know exactly which line to replace and don’t want to match
the line using regular expressions. The below example changes the
third line of the seq command’s output.
$ seq 5 | sed '3 c 123'
It replaces the content of the third line, which is 3, with the
number 123. The next example shows us how to change the last line
of our input-file using ‘c’.
$ sed '$ c CHANGED STRING' input-file
We can also use regex for selecting the line number to change.
The next example illustrates this.
$ sed '/demo*/ c CHANGED TEXT' input-file
26. Creating Backup Files for
Input
If you want to transform some text and save the changes back to
the original file, we highly recommend you to create backup files
before proceeding. The following command performs some sed
operations on our input-file and saves it as the original.
Moreover, it creates a backup called input-file.old as a
precaution.
$ sed -i.old 's/one/1/g; s/two/2/g; s/three/3/g' input-file
The -i option writes the changes made by sed to
the original file. The .old suffix part is responsible for creating
the input-file.old document.
27. Printing Lines Based on
Patterns
Say, we want to print all lines from an input based on a certain
pattern. This is fairly easy when we combine the sed commands
‘p’ with the -n option. The
following example illustrates this using the input-file.
$ sed -n '/^for/ p' input-file
This command searches for the pattern ‘for’ at the beginning of
each line and print only lines that start with it. The
‘^’ character is a special regular expression
character known as an anchor. It specifies the pattern should be
located at the beginning of the line.
28. Using SED as An Alternative to
GREP
The grep command in Linux[6]
searches for a particular pattern in a file and, if found, displays
the line. We can emulate this behavior using the sed utility. The
following command illustrates this using a simple example.
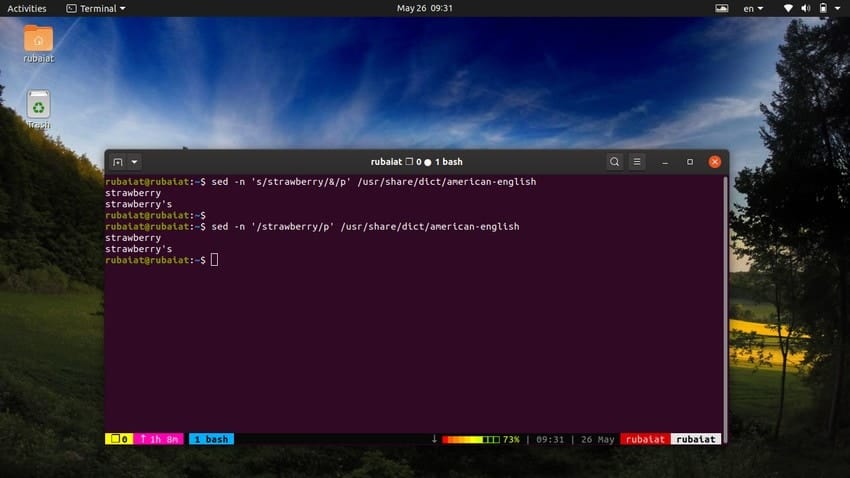
$ sed -n 's/strawberry/&/p' /usr/share/dict/american-english
This command locates the word strawberry in the
american-english dictionary file. It works by
searching for the pattern strawberry and then uses a matched string
alongside the ‘p’ command to print it. The
-n flag suppresses all other lines in the output.
We can make this command more simple by using the following
syntax.
$ sed -n '/strawberry/p' /usr/share/dict/american-english
29. Adding Text from
Files
The ‘r’ command of the sed utility allows us to
append text read from a file to the input stream. The following
command generates an input stream for sed using the seq command and
appends the texts contained by input-file to this stream.
$ seq 5 | sed 'r input-file'
This command will add the contents of the input-file after each
consecutive input sequence produced by seq. Use the next command to
add the contents after the numbers generated by seq.
$ seq 5 | sed '$ r input-file'
You may use the following command to add the contents after the
n-th line of input.
$ seq 5 | sed '3 r input-file'
30. Writing Modifications to
Files
Suppose we have a text file that contains a list of web
addresses. Say, some of them start with www, some https, and others
http. We can change all addresses that start with www to start with
https and save only those that were modified to a whole new
file.
$ sed 's/www/https/ w modified-websites' websites
Now, if you inspect the contents of the file modified-websites,
you will find only the addresses that were changed by sed. The
‘w filename‘ option causes sed to write the
modifications to the specified filename. It is useful when you’re
dealing with large files and want to store the modified data
separately.
31. Using SED Program
Files
Sometimes, you may need to perform a number of sed operations on
a given input set. In such cases, it is better to write a program
file containing all the different sed scripts. You can then simply
invoke this program file by using the -f option of
the sed utility.
$ cat << EOF >> sed-script
s/a/A/g
s/e/E/g
s/i/I/g
s/o/O/g
s/u/U/g
EOF
This sed program changes all lowercase vowels to uppercase. You
can run this by using the below syntax.
$ sed -f sed-script input-file
$ sed --file=sed-script < input-file
32. Using Multi-Line SED
Commands
If you’re writing a large sed program that spans over multiple
lines, you will need to quote them properly. The syntax differs
slightly between different Linux shells. Luckily, it is
very simple for the bourne shell and its derivatives(bash). [7]
$ sed '
s/a/A/g
s/e/E/g
s/i/I/g
s/o/O/g
s/u/U/g' < input-file
In some shells, like the C shell (csh), you need to protect the
quotes using the backslash(\) character.
$ sed 's/a/A/g \
s/e/E/g \
s/i/I/g \
s/o/O/g \
s/u/U/g' < input-file
33. Printing Line
Numbers
If you want to print the line number containing a specific
string, you can search for it using a pattern and print it very
easily. For this, you will need to use the ‘=’
command of the sed utility.
$ sed -n '/ion*/ =' < input-file
This command will search for the given pattern in input-file and
print its line number in the standard output. You can also use a
combination of grep and awk to tackle this.
$ cat -n input-file | grep 'ion*' | awk '{print $1}'
You can use the following command to print the total number of
lines in your input.
$ sed -n '$=' input-file
34. Preventing Symlink
Overwriting
The sed ‘i’ or ‘–in-place‘
command often overwrites any system links with regular files. This
is an unwanted situation in many cases, and thus users might want
to prevent this from happening. Luckily, sed provides a simple
command-line option to disable symbolic link overwriting.
$ echo 'apple' > fruit
$ ln --symbolic fruit fruit-link
$ sed --in-place --follow-symlinks 's/apple/banana/' fruit-link
$ cat fruit
So, you can prevent symbolic link overwriting by using the
–follow-symlinks option of the sed utility. This
way, you can preserve the symlinks while performing text
processing.
35. Printing All Usernames From
/etc/passwd
The /etc/passwd file contains system-wide information
for all user accounts in Linux. We can get a list of all the
usernames available in this file by using a simple one-liner sed
program. Take a close look at the below example to see how this
works.
$ sed 's/\([^:]*\).*/\1/' /etc/passwd
We have used a regular expression pattern to get the first field
from this file while discarding all other information. This is
where the usernames reside in the /etc/passwd file.
Many system tools, as well as third-party applications, come
with configuration files. These files usually contain a lot of
comments describing the parameters in detail. However, sometimes
you may want to display only the configuration options while
keeping the original comments in place.
$ cat ~/.bashrc | sed -e 's/#.*//;/^$/d'
This command deletes the commented lines from the bash
configuration file. The comments are marked using a preceding ‘#’
sign. So, we have removed all such lines using a simple regex
pattern. If the comments are marked using a different symbol,
replace the ‘#’ in the above pattern with that specific symbol.
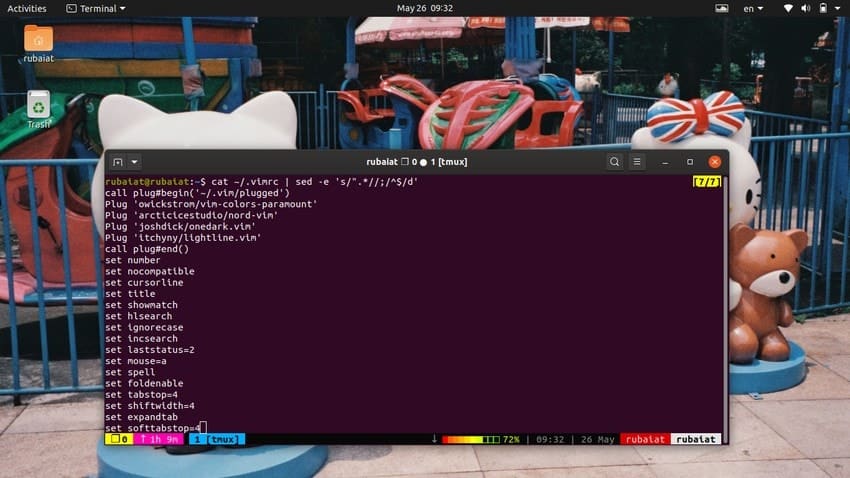
$ cat ~/.vimrc | sed -e 's/".*//;/^$/d'
This will remove the comments from the vim configuration file,
which starts with a double quote (“) symbol.
37. Deleting Whitespaces from
Input
Many text documents are filled with unnecessary whitespaces.
Oftentimes they are the result of poor formatting and can mess up
the overall documents. Luckily, sed allows users to remove these
unwanted spacing pretty easily. You can use the next command to
remove leading whitespaces from an input stream.
$ sed 's/^[ \t]*//' whitespace.txt
This command will remove all leading whitespaces from the file
whitespace.txt. If you want to remove trailing whitespaces, use the
following command instead.
$ sed 's/[ \t]*$//' whitespace.txt
You may also use the sed command to remove both leading and
trailing whitespaces at the same time. The below command can be
used to do this task.
$ sed 's/^[ \t]*//;s/[ \t]*$//' whitespace.txt
38. Creating Page Offsets with
SED
If you have a large file with zero front paddings, you may want
to create some page offsets for it. Page offsets are simply leading
whitespaces that help us read the input lines effortlessly. The
following command creates an offset of 5 blank spaces.
$ sed 's/^/ /' input-file
Simply increase or reduce the spacing to specify a different
offset. The next command reduces the page offset at 3 blank
lines.
$ sed 's/^/ /' input-file
39. Reversing Input
Lines
The following command shows us how to use sed for reversing the
order of lines in an input file. It emulates the behavior of the
Linux tac command.
$ sed '1!G;h;$!d' input-file
This command reverses the lines of the input-line document. It
can also be done using an alternative method.
$ sed -n '1!G;h;$p' input-file
40. Reversing Input
Characters
We can also use the sed utility to reverse the characters on the
input lines. This will reverse the order of each consecutive
character in the input stream.
$ sed '/\n/!G;s/\(.\)\(.*\n\)/&\2\1/;//D;s/.//' input-file
This command emulates the behavior of the Linux
rev command. You can verify this by running the
below command after the above one.
$ rev input-file
41. Joining Pairs of Input
Lines
The following simple sed command joins two consecutive lines of
an input file as a single line. It is useful when you have a large
text containing split lines.
$ sed '$!N;s/\n/ /' input-file
$ tail -15 /usr/share/dict/american-english | sed '$!N;s/\n/ /'
It is useful in a number of text manipulation tasks.
42. Adding Blank Lines on Every
N-th Line of Input
You can add a blank line on every n-th line of the input file
very easily using sed. The next commands add a blank line on every
third line of input-file.
$ sed 'n;n;G;' input-file
Use the following to add the blank line on every second
line.
$ sed 'n;G;' input-file
43. Printing the Last N-th
Lines
Earlier, we’ve used sed commands to print input lines based on
line number, ranges, and pattern. We can also use sed to emulate
the behavior of head or tail commands. The next example prints the
last 3 lines of input-file.
$ sed -e :a -e '$q;N;4,$D;ba' input-file
It is similar to the below tail command tail -3
input-file.
44. Print Lines Containing
Specific Number of Characters
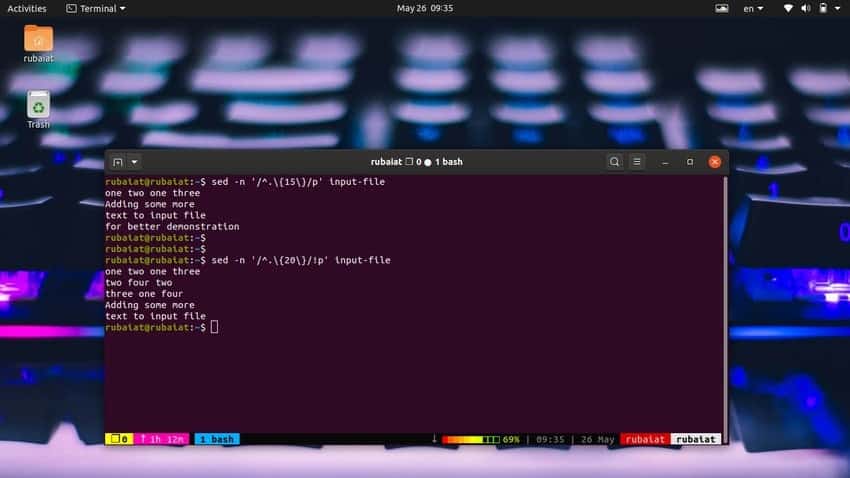
It is very easy to print lines based on character count. The
following simple command will print lines that have 15 or more
characters in it.
$ sed -n '/^.\{15\}/p' input-file
Use the below command to print lines that has less than 20
characters.
$ sed -n '/^.\{20\}/!p' input-file
We can also do this in a simpler way using the following
method.
$ sed '/^.\{20\}/d' input-file
45. Deleting Duplicate
Lines
The following sed example shows us to emulate the behavior of
the Linux uniq command. It deletes any two
consecutive duplicate lines from the input.
$ sed '$!N; /^\(.*\)\n\1$/!P; D' input-file
However, sed can not delete all duplicate lines if the input is
not sorted. Although you can sort the text using the sort command
and then connect the output to sed using a pipe, it will change the
orientation of the lines.
46. Deleting All Blank
Lines
If your text file contains a lot of unnecessary blank lines, you
may delete them using the sed utility. The below command
demonstrates this.
$ sed '/^$/d' input-file
$ sed '/./!d' input-file
Both of these commands will delete any blank lines present in
the specified file.
47. Deleting Last Lines of
Paragraphs
You can delete the last line of all paragraphs using the
following sed command. We will use a dummy filename for this
example. Replace this with the name of an actual file that contains
some paragraphs.
$ sed -n '/^$/{p;h;};/./{x;/./p;}' paragraphs.txt
48. Displaying the Help
Page
The help page contains summarized information on all available
options and usage of the sed program. You can invoke this by using
the following syntax.
$ sed -h
$ sed --help
You can use any of these two commands to find a nice, compact
overview of the sed utility.
49. Displaying the Manual
Page
The manual page provides an in-depth discussion of sed, its
usage, and all available options. You should read this carefully to
understand sed clearly.
$ man sed
50. Displaying Version
Information
The –version option of sed allows us to view
which version of sed is installed in our machine. It is useful when
debugging errors and reporting bugs.
$ sed --version
The above command will display the version information of the
sed utility in your system.
Ending Thoughts
The sed command is one of the most widely used text manipulation
tools provided by Linux distributions. It is one of the three
primary filtering utilities in Unix, alongside grep and awk. We
have outlined 50 simple yet useful examples to help readers get
started with this amazing tool. We highly recommend users to try
these commands themselves to gain practical insights. Additionally,
try tweaking the examples given in this guide and examine their
effect. It will help you master sed quickly. Hopefully, you’ve
learned the basics of sed clearly. Don’t forget to comment below if
you’ve any questions.
References
- ^
awk
command for beginners (www.ubuntupit.com) - ^
the ed
utility (en.wikipedia.org) - ^
Linux
text editors (www.ubuntupit.com) - ^
the
Linux terminal (www.ubuntupit.com) - ^
Linux
terminal commands (www.ubuntupit.com) - ^
grep
command in Linux (www.ubuntupit.com) - ^
different Linux shells
(www.ubuntupit.com)
Read more https://www.ubuntupit.com/practical-examples-of-the-sed-command-in-linux/