Linux offers some of the best networking utilities for end
users. For a long time, the ifconfig commands have been the go-to
solution for handling network parameters in Linux. However,
ifconfig has become outdated for some time, and the Unix community
is adopting the Linux IP command as a replacement for this powerful
tool. The ip command allows users and network admins to configure
their IP addresses, routing policies, and network interfaces very
easily. It is a worthy upgrade over ifconfig in terms of
performance and features. So, if you are still using ifconfig, it
is high time to try your hands on the ip utility. [1]
Linux IP Commands for Network
Management
The ip utility offers several additional functionalities over
ifconfig. You will usually use ifconfig to manipulate network
interfaces and IP addresses. But, the ip command allows us to
manipulate even the routing tables as well as ARP tables. You will
learn how to make use of these practical commands once you’ve
understood our examples.
Basic Usage of Linux IP
Commands
ip [ OPTIONS ] OBJECT { COMMAND | help }
The ip command in Linux takes the above form. Here,
OBJECT can be several things, including network
interfaces, IP addresses, routing rules, tunnels, and ARP tables.
Each object can be specified using either a long-form or
abbreviated form, like a or address.
1. Check IP Addresses and
Properties of All Network Interfaces
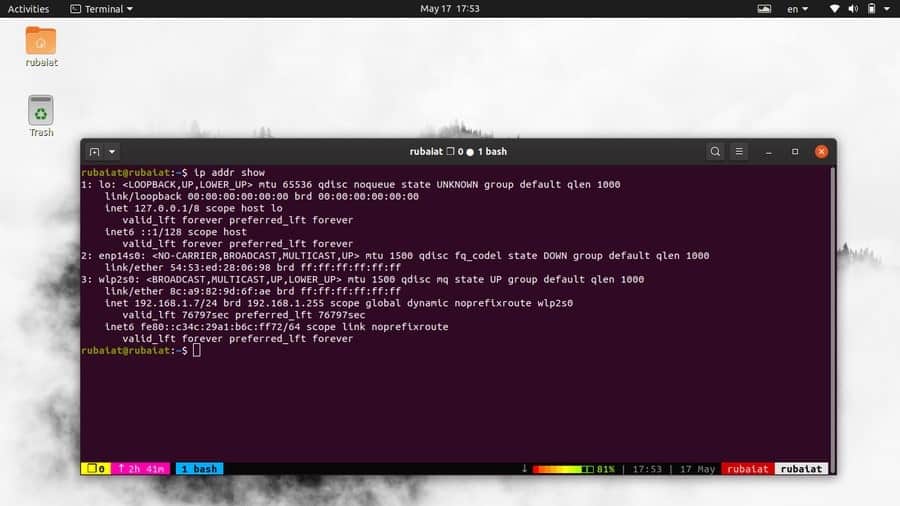
You can use the following command to display the IP address as
well as its properties for all available interfaces in your system.
The output of this command is very similar to that of ifconfig.
$ sudo ip addr show
You can also use the short form a for
addr. They are equivalent and display the same
information.
$ sudo ip a show
The result should contain the name of all network interfaces and
their respective IP addresses. The IP information is denoted by the
term inet.
2. Check IP Addresses and
Properties for Specific Devices
It is also very easy to display IP information for a selected
device. Simply use the dev option, followed by the interface name
as its argument.
$ sudo ip a show dev wlp2s0
$ sudo ip addr show dev wlp2s0
Here wlp2s0 is the wireless interface. replace this with the
name of the interface you want to check. For example, ethernet
interfaces are often represented via eth0. However, these can
easily vary across systems, so make sure to supply a name that
exists in your host.
3. Display IPv4 Addresses
Only
The above commands show much useful information alongside the ip
addresses. However, if you are only interested in the IP address
itself, you can omit that extra information. Take a close at the
below command to see how this works.
$ sudo ip -4 addr
$ sudo ip -4 addr show
These commands are equivalent, but they list the interfaces that
have an active IPv4 address. However, they still provide much extra
information. You can use the Linux grep command to filter this
output and display the IPv4 addresses only. [2]
$ sudo ip -4 addr show | grep -oE "\b([0-9]{1,3}\.){3}[0-9]{1,3}\b"
4. Display IPv6 Addresses
Only
We can also display only the IPv6 addresses using the ip utility
and the Linux awk command[3]. We can also use the
grep utility, but it will require a much larger regular expression
pattern.
$ sudo ip -6 addr show | awk '/inet6/ {print $2}'
When you run the above command, it will spit out all the IPv6
addresses for your interfaces.
5. Add an IP Address
The Linux IP command makes it very easy for admins to add a new
IP address. We are illustrating how to add an IP address to a
specific network device in the below example. Take a close look at
the syntax to make sure you understand what’s going on.
$ sudo ip addr add 192.168.1.1/24 dev eth0
This command adds the IP address 192.168.1.1 with the netmask 24
to the ethernet interface eth0. Simply substitute the interface
name to reflect the change in a different device.
6. Add a Broadcast
Address
The broadcast address sends network packets to every device that
is connected to the network. You can add a custom broadcast address
using one of the following simple ip commands.
$ sudo ip addr add brd 192.162.125.200 dev eth0
$ sudo ip addr add broadcast 192.162.125.200 dev eth0
Now, the broadcast address for the eth0 interface is set to be
192.162.125.200. However, bear in mind that network interfaces in
Linux obtain the broadcast information themselves. So, you should
only assign it when you’re setting up a network yourself.
7. Delete an IP
Address
It is also very easy to delete an IP assigned to a specific
network. Take a close look at the next ip command example to see
how this works in practice.
$ sudo ip addr del 192.168.1.1/24 dev eth0
This command deletes the IP address 192.168.1.1/24 from the
ethernet interface.
8. Flush IP
Addresses
You will need to use the above command multiple times for
deleting all of the IP addresses from different interfaces.
However, if you want to start over, flushing your IP addresses
might turn out to be a good start.
$ sudo ip -s -s a f to 192.168.1.0/24
This command will delete all the IP addresses associated with
the network 192.168.1.0/24. You may also flush IPs based on their
label.
$ sudo ip -4 addr flush label "eth*"
This command will flush all IPv4 addresses for the ethernet
interfaces of your system.
9. Display Information for All
Available Interfaces
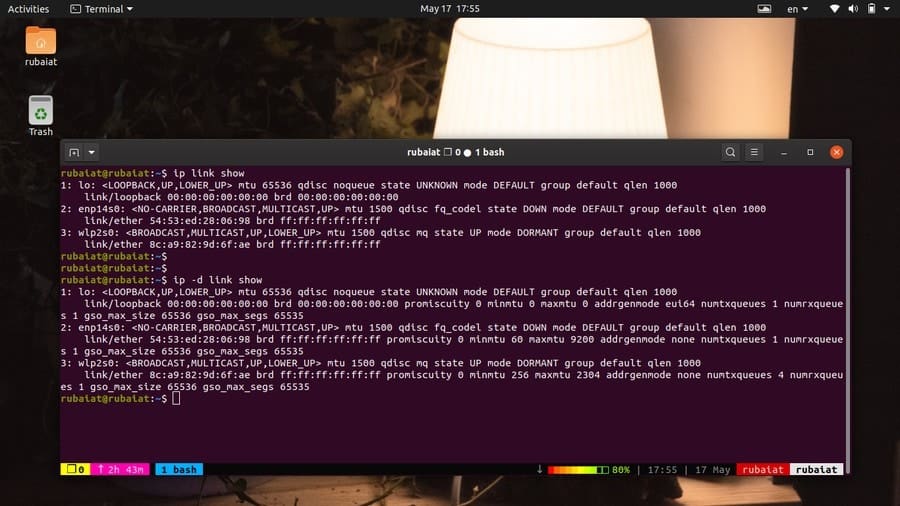
The link object represents the network interfaces. You can
display information about all network interfaces in your Linux
machine by using the following simple commands.
$ sudo ip link
$ sudo ip link show
Both of them are equivalent and show information like the MAC,
interface state, and so on. You can replace link
with l as a short form. You can also use the
-d and -h option of the ip
command for getting more detailed information in a human-readable
format.
$ sudo ip -d -h link show
10. Display Interface Information
for Specific Devices
Like the IP addresses, we can also display interface information
for a single device. You will need to use the dev option similarly,
followed by the device name, as demonstrated in the below
example.
$ sudo ip link show dev eth0
This is useful for troubleshooting specific devices since it
omits unnecessary information. Use the below command to get extra
information in an easily readable format.
$ sudo ip -d -h link show dev eth0
11. Display Statistics Data for
Interfaces
Statistical data makes it very easy to identify and troubleshoot
network problems. You can use any of the following commands to
display statistics information for a particular interface very
easily.
$ sudo ip -s link show wlp2s0
$ sudo ip -stats link show wlp2s0
$ sudo ip -statistics link show wlp2s0
All of the above commands are equivalent. So, you can use any of
-s, -stats, or
-statistics. However, you may use them more than
once in your commands. This will give additional statistics
information.
$ sudo ip -s -stats -statistics link show wlp2s0
12. Display Statistics Data for
All Interfaces
The ip utility also allows network admins to print out
statistics data for all available interfaces in your system. This
is very similar to the above command. Simply omit the name of any
particular interface and ip will display statistics for all of
them.
$ sudo ip -s link show
$ sudo ip -stats link show
$ sudo ip -statistics link show
Likewise, we can also use the flags more than once to obtain
additional information. The below command demonstrates this.
$ sudo ip -s -stats -statistics link show
13. Enable a Specific Network
Interface
The ip command makes it very easy to bring an interface online.
So, if you are still using the ifconfig command to do this, check
out the following example carefully.
$ sudo ip link set wlp2s0 up
This command will enable the wireless interface wlp2s0 in your
system. Since many systems specify this interface as wlan0, make
sure you are using the appropriate device name based on your
system.
14. Disable a Specific Network
Interface
We can also disable a network very easily by using the ip
sub-command link set. The following example demonstrates how to
disable the wireless interface wlp2s0 that we just enabled in the
earlier example.
$ sudo ip link set wlp2s0 down
The above command will make the wlp2s0 interface offline. You
need to enable it again if you want to transfer network packets
using the wireless interface.
15. Assign Custom MTU to an
Interface
MTU stands for Maximum Transmission Unit[4] and addresses the size
cap of packets that can be sent by a particular network interface.
You can use the below Linux ip command for assigning a custom MTU
size for an interface.
$ sudo ip link set wlp2s0 mtu 5000
This command sets the MTU of the wireless interface wlp2s0 to be
5000. You can confirm the change by checking the interface
information.
16. Enable Promiscuous
Mode
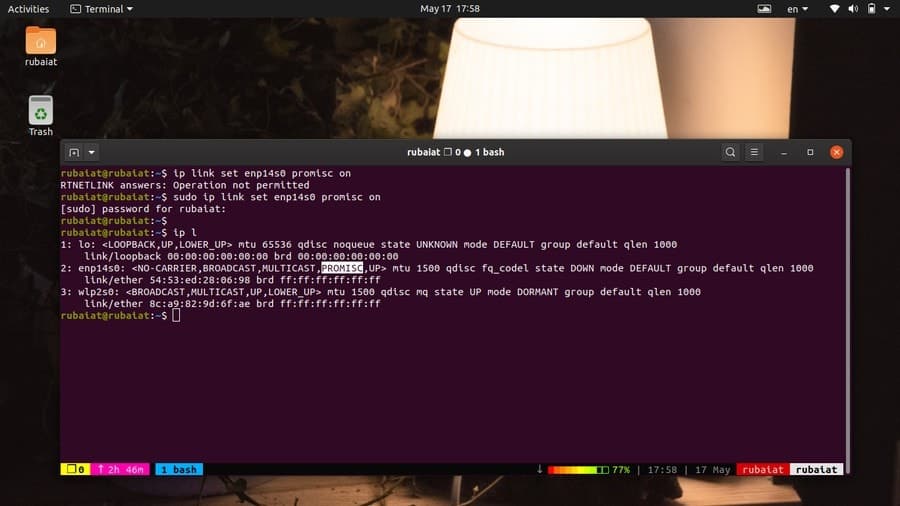
The promiscuous mode allows an interface to send all IP packets
to your CPU, including those that are not destined to reach the
system. It is often useful for troubleshooting purposes and network
auditing. Take a quick look at the below command to see how to do
this using the ip command-line tool.
$ sudo ip link set wlp2s0 promisc on
When you run the above command, it will turn on the promiscuous
mode for the wireless interface. You can also enable it for other
network interfaces as long as it is supported by the network
interface controller.
17. List all Enabled
Interfaces
Since you will often work with systems that have more than one
interface, you may want to list the currently enabled devices. This
will come in handy during network troubleshooting and system
auditing.
$ sudo ip link ls up
This command will print out all actively running network
interfaces in your Linux machine alongside their usual properties.
Use the -d flag of the ip command to get more
detailed information about each interface.
$ sudo ip -d link ls up
18. Assign Custom Transmission
Queue Length to an Interface
You can control the bandwidth usage of your network by modifying
the transmission queue length of an interface. Transmission queue
length refers to the maximum size of data packets allowed by the
device driver.
$ sudo ip link set txqueuelen 1500 dev wlp2s0
This command sets the transmission queue length of the wireless
interface to be 1500. We are using the link set sub-command for
assigning this value.
19. Enable Trailers for Ethernet
Interface
Trailer encapsulation allows the Linux kernel to minimize
memory-to-memory copy operations on a receiving host and reduce
packet processing time. This feature is supported by the Ethernet
interface only. You can use the following Linux ip command to
enable this on your system.
$ sudo ip link set dev eth0 trailers on
This command will enable trailer support for the eth0 device.
Notice how we are first specifying the device before enabling this
feature.
20. Disable Trailers for Ethernet
Interface
Disabling trailer encapsulation is also pretty straightforward
using the ip utility. Simply replace the on portion of the above
command with off to do this.
$ sudo ip link set dev eth0 trailers off
Now, the trailer feature will be turned off for the eth0
device.
21. Change MAC
Address
If you want to change your MAC address in Linux, you can easily
do so using the ip utility. First, turn off the interface using the
following command.
$ sudo ip link set dev eth0 down
Now, you need to set the MAC address by issuing the next
command.
$ sudo ip link set dev eth0 address 8e:a9:82:9d:6f:ac
This command sets the MAC address of the eth0 interface to be
8e:a9:82:9d:6f:ac. Finally, bring your network interface online by
using the below command.
$ sudo ip link set dev eth0 up
22. Rename Network
Interfaces
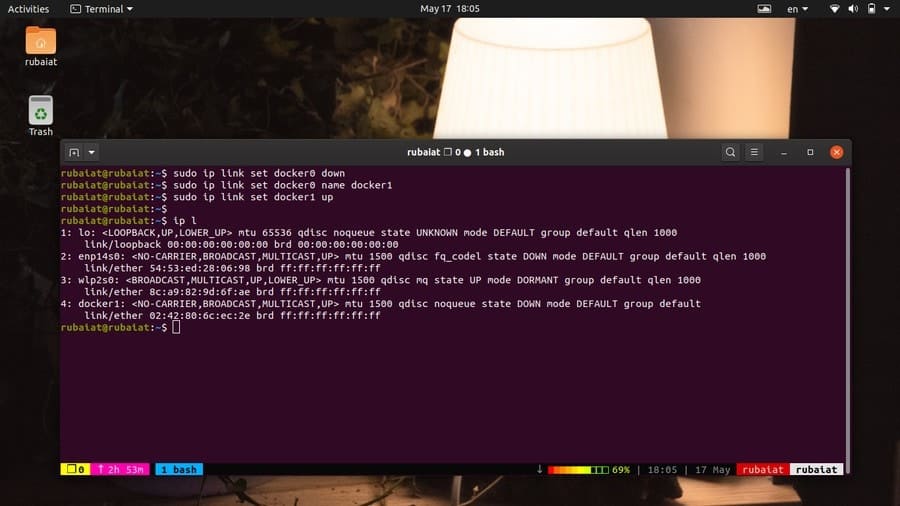
You can easily rename network interfaces using the Linux ip
command. The below command demonstrates how to rename the eth0
interface to eth1.
$ sudo ip link set eth0 down
$ sudo ip link set eth0 name eth1
$ sudo ip link set eth1 up
We need to disable the interface before we can rename it. You
can rename any network interface in your system using the above
method.
23. Display Network
Tunnels
Network tunnels allow our system to send sensitive information
over the public internet. You can print the list of active tunnels
by using the ip tunnel sub-command.
$ sudo ip tunnel
$ sudo ip tunnel show
Both of these commands are equivalent and will display the list
of network tunnels upon execution.
24. Display IP Routing
Table
Every IP-enabled devices use some kind of routing tables to
evaluate where to redirect traveling IP packets. The Linux ip
command allows admins to view this information very easily. Take a
quick look at the below command to see how this works.
$ sudo ip route
This command will print out all the routing information loaded
in the kernel. You may also add, delete, or replace routing entries
as required.
25. Add Entries to Routing
Table
Sometimes admin might need to add an entry to the routing table
manually. The route command allows users to this, and many network
admins still use that. However, you can add entries to your routing
table using the ip command directly. The below command illustrates
this with a practical example.
$ sudo ip route add default via 192.168.1.1 dev wlp2s0
This command adds a default route for the ethernet device
wlp2s0. The IP address 192.168.1.1 is the local gateway for your
network. Thus, the above command allows a route for all addresses
via the local gateway to the wireless device.
26. Add Routing Entry for a
Sub-Network
The below command shows us how to add a route to a sub-network
using the ip route command. We will need to use a gateway for this,
so we are going to use the default gateway, which is
192.168.1.1.
$ sudo ip route add 192.168.1.0/24 via 192.168.1.1
The above command will add a route tp the network 192.168.1.0/24
via the local gateway 192.168.1.1. Most consumer-grade routers and
modems today use this IP as their gateway.
27. Add Routing Rules for Specific
Devices
It is very easy to add a route to a sub-network which can be
reached by a particular network device all the time. The below
simple command will illustrate this for the wireless interface
wlp2s0.
$ sudo ip route add 192.168.1.0/24 dev wlp2s0
After the above command is done executing, all addresses in the
range 192.168.1.0/24 can reach the wlp2s0 interface freely.
28. Delete Entries from the
Routing Table
If you want to remove a particular entry from your routing
table, you can do so very easily by using the route delete
sub-command of the ip utility. The below command shows you how to
do this from your Linux terminal emulator[5]
at ease.
$ sudo ip route delete 192.168.1.0/24 via 192.168.1.1
This command will remove the route for the network
192.168.1.0/24 via the default gateway 192.168.1.1. This is the
entry we created in an earlier example.
29. Replace an Entry in the
Routing Table
We can easily replace an entry to the routing table by using the
route replace sub-command of the Linux ip command. The below
example will replace any defined route for the sub-network
192.168.1.0/24 to the wlp2s0 interface.
$ sudo ip route replace 192.168.1.0/24 dev wlp2s0
This command will create the route if it is not defined already.
It provides a handy way of manipulating existing routing rules.
30. Display the Route Taken by an
Address
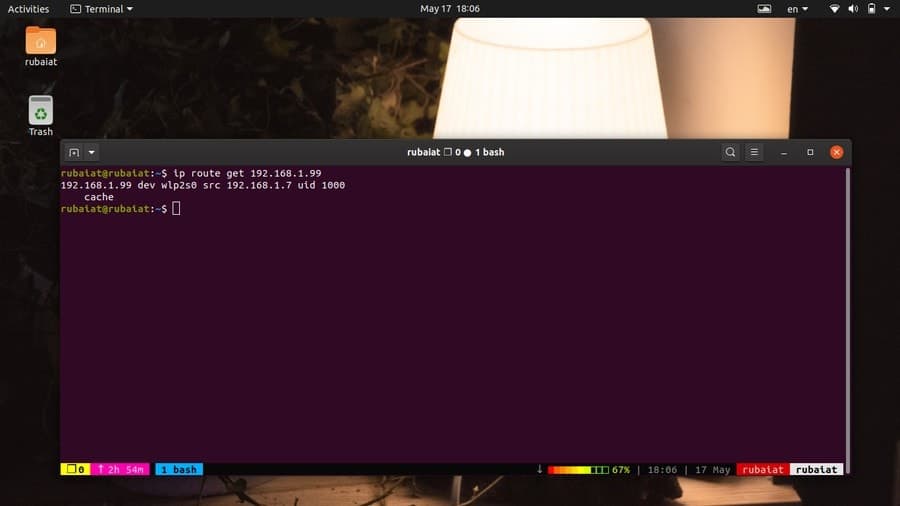
Admins often need to determine the route taken by an IP address.
It helps to troubleshoot network problems and making sure packets
are transmitted the way they are intended. The below example shows
us how to do this effectively using the ip utility.
$ sudo ip route get 192.168.1.5
This command displays the path taken for the IP address
192.168.1.5 in your network. Use the below command to get a
statistical overview.
$ sudo ip -s route get 192.168.1.5
31. Add Persistence Static
Routes
Till now, we have seen how to add or delete static routes using
the Linux ip command. However, these routes are not permanent and
will be lost after the system restarts. You can make the changes
permanent by doing the following tasks.
$ sudo vim /etc/sysconfig/network-scripts/route-wlp2s0
192.168.1.0/24 via 192.168.1.1
Exit your vim or your Linux text editor[6]
after appending the above line. Now restart the Network Manager.
This will make the specified route permanent on RHEL or CentOS
systems.
$ sudo systemctl restart NetworkManager
Now, to add this route permanently on Debian or Ubuntu
distributions set the following.
$ sudo vim /etc/network/interfaces
up route add -net 192.168.1.0 netmask 255.255.255.0 gw 192.168.1.1 dev wlp2s0
Now, you need to bring your interface down and then up again to
reflect this change. You can do so using the following
commands.
$ sudo ip link set wlp2s0 down
$ sudo ip link set wlp2s0 up
32. Display Multicast IP
Addresses
Multicast IP addresses are used for sending or receiving
multicast messages across network devices. You can use the
following simple command to print out the list of all available
multicast IP addresses in your system.
$ sudo ip maddr
$ sudo ip maddr show
Both of these commands are equivalent and display a nicely
formatted list of multicast addresses for a given network.
33. Display Multicast Information
for Specific Devices
The above commands display the multicast information for all
network devices. If you want to troubleshoot a specific device, you
can use the following command instead.
$ sudo ip maddr show dev eth0
Here, we are using the dev option to specify the wlp2s0 wireless
interface. It will now print out the multicast information for only
this particular device. Replace the device name with any of the
devices in your machine.
34. Add a Multicast
Address
Adding multicast addresses is quite effortless using the ip
command. We can easily do so by utilizing the maddr add sub-command
of ip. Take a quick look at the below illustration to see how this
works in real-life.
$ sudo ip maddr add 44:22:00:00:00:01 dev eth0
The above command adds the multicast address 44:22:00:00:00:01
for the eth0 network device. Replace the interface name with your
appropriate interface and the address with the desired one.
35. Delete a Multicast
Address
We can also delete the multicast address for a specific network
device just the way we added it. To remove the multicast address
44:22:00:00:00:01 from the eth0 interface, use the following
command in your Linux terminal.
$ sudo ip maddr del 44:22:00:00:00:01 dev eth0
So, by simply using the maddr del sub-command of ip, we are able
to remove the multicast address. Make sure to specify the correct
device, or else you may end up with unwanted multicasting.
36. Enable Multicast
Addressing
Use the following simple command if you want to set the
multicast addressing mode for a specific interface. We will be
using the link set sub-command of the ip utility for enabling
multicast addressing.
$ sudo ip link set eth0 multicast on
Now, multicast addressing is allowed on the ethernet interface
eth0.
37. Disable Multicast
Addressing
If you are a home user, you may want to disable the multicast
addressing feature altogether. Thankfully, disabling this feature
is as easy as enabling it. Take a close look at the below example
to see how you can do this using the ip utility.
$ sudo ip link set eth0 multicast off
So, by simply using the multicast off option for an interface,
you can turn off this feature.
38. Enable All-Multicast for
Interfaces
The allmulticast mode allows an interface to receive all
multicast packets directly. You can enable it for a specific
network device very easily. The below command illustrates this for
the ethernet interface eth0.
$ sudo ip link set eth0 allmulticast on
We4 have selected the eth0 interface by using the link set
sub-command and turned on the allmulticast feature using the on
option.
39. Disable All-Multicast for
Interfaces
You can disable allmulticast altogether by toggling the on the
option to off. The below command demonstrates this for the eth0
interface.
$ sudo ip link set eth0 allmulticast off
Now, allmulticast is disabled altogether for this specific
network device.
40. Display the ARP
Table
The ip neighbor table objects or the ARP (Address Resolution Protocol) table
contains the mapping between IP addresses and their respective MAC
addresses whenever sending a network packet, the system first
lookups in this table to determine whether it already knows the MAC
for that address. [7]
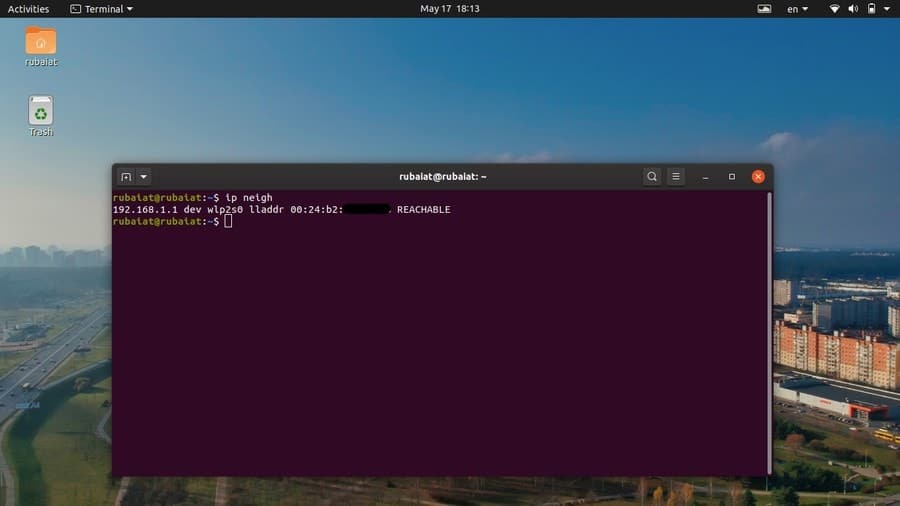
$ sudo ip neigh
When you run this command, ip will show the neighbor objects or
the ARP table in your Linux terminal emulator. It shows the MAC
address for the active network device alongside other useful
information.
41. Display ARP Cache for Specific
Devices
You can find the ARP entries associated with a single network
device by supplying its name after the dev option. Take a look at
the below example to see how this works in general.
$ sudo ip neigh show dev wlp2s0
This command will output the ARP entry for the wireless network
interface called wlp2s0. Note that the name of this wireless
interface may be different in your machine, like wlan0 or something
else. So make sure you are using the right name, or else you’ll not
get the desired output.
42. Add an ARP Entry for a
Device
If you want to add an entry to the ARP manually, you can easily
do so by using the following simple command. You need to supply the
IP address as well as the MAC you want to set.
$ sudo ip neigh add 192.168.1.1 lladdr 1:2:3:4:5:6 dev eth0
Here, we are mapping the MAC address 1:2:3:4:5:6 to the IP
address 192.168.1.1. We are also specifying the network interface
to be eth0.
43. Delete an ARP Entry for a
Device
You can also delete an ARP entry using the Linux ip command very
easily. The below example demonstrates how to remove the ARP entry
we created in the above example.
$ sudo ip neigh del 192.168.1.1 dev eth0
This command will invalidate the ARP entry for the eth0 device.
As you can see, the neigh del command allows us to remove neighbor
table objects.
44. Replace an Entry in the ARP
Table
Admins do not need to manually remove an ARP entry and create a
new one for a specific device. They can simply replace the old
entry with a new one by using the neigh replace sub-command of the
ip utility. The below command illustrates how this works.
$ sudo ip neigh replace 192.168.1.1 lladdr 6:5:4:3:2:1 dev eth0
This command will replace the ARP entry for the ip address
192.168.1.1 with the given MAC address. If this rule does not exist
yet, it will create a new entry using this mapping.
45. Flush ARP
Entries
The Linux ip command also allows us to flush the ARP entry
similar to IP addresses. For example, the below command will delete
the neighbor table for the IP address 192.168.1.1.
$ sudo ip -s -s n f 192.168.1.1
This command is the same as the following command. Here, we are
using the long form of the flush sub-command rather than the short
one.
$ sudo ip -s -s n flush 192.168.1.1
46. Colorize IP
Output
The Linux ip command provides a lot of data, and thus, users may
occasionally have a hard time locating essential information.
Luckily, you can use the -c option of the ip
utility for colorizing the output.
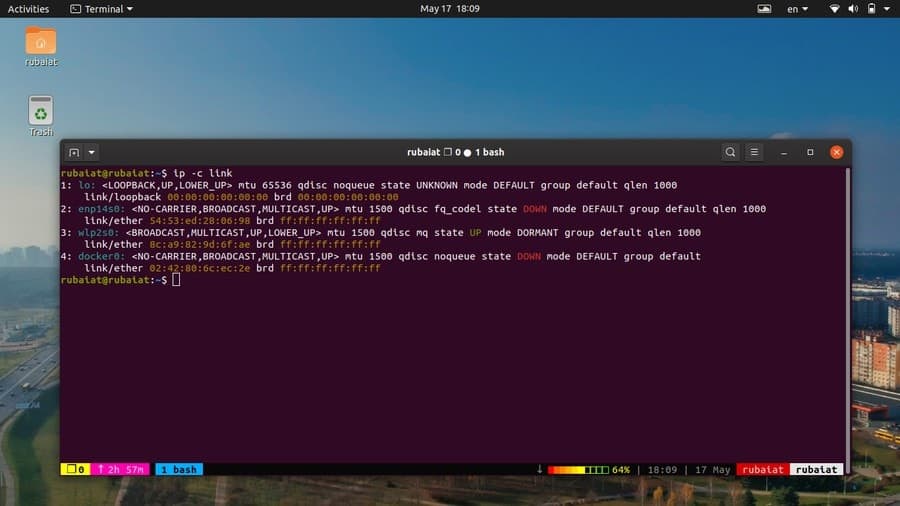
$ sudo ip -c -4 addr
$ sudo ip -c link
The first command will display the IPv4 addresses as well as the
interface names in distinctive colors. The second command will
highlight the MAC address and interface state as well as names.
47. Generate JSON
Output
JSON or JavaScript Object Notation is a data representation
format that is widely used by web applications as well as other
tools. Data stored in this format can be easily interchanged with
many services. You can generate the result of your ip commands as
JSON data by using the following command.
$ sudo ip -j route
$ sudo ip -j link show docker0
Simply add the -j option to your command, and
ip will convert the terminal output to JSON.
48. Display Version
Information
Use the following command if you want to view which version of
the ip utility you are using.
$ ip -V
Note that it is a capital V, not the lowercase v used by many
Linux terminal commands[8].
49. Display Help
Page
The help page of ip provides summarized information of all
possible command-line arguments as well as their usage. You can
print out this information in several ways.
$ ip help
$ ip --help
These commands print the standard help page. However, you can
also display the help page for a particular sub-command, as
demonstrated by the below examples.
$ ip link help
$ ip route help
The first command displays the help page for the link
sub-command and the second one for the route sub-command.
50. Display Man Page
The man page or manual contains in-depth information about the
various options and syntaxes of the Linux IP command. You can
display it by using the following simple command.
$ man ip
This will print the primary manual for the ip utility. You can
also view a specific entry in the manual. Take a close look at the
below commands to see how this works.
$ man ip-address
$ man ip-link
The first command shows the manual page for the address
sub-command during the second one for the link sub-command.
Ending Thoughts
The Linux ip command packs in an easy to use yet practical
interface for various Linux network commands[9]. If you are used to
using legacy networking tools like ifconfig and route, it is high
time to start your transition towards the ip utility. We have
compiled this guide to help our readers make the best of their time
and learn the essentials as fast as possible. As you gain
experience, you will find out many more things you can do using
this simple terminal application. Hopefully, we were able to be of
help, and please leave us a comment if you have any questions or
suggestions.
References
- ^
ifconfig
commands (www.ubuntupit.com) - ^
the
Linux grep command (www.ubuntupit.com) - ^
the
Linux awk command (www.ubuntupit.com) - ^
Maximum
Transmission Unit (en.wikipedia.org) - ^
Linux
terminal emulator (www.ubuntupit.com) - ^
Linux
text editor (www.ubuntupit.com) - ^
ARP
(Address Resolution Protocol)
(en.wikipedia.org) - ^
Linux
terminal commands (www.ubuntupit.com) - ^
various
Linux network commands (www.ubuntupit.com)
Read more https://www.ubuntupit.com/useful-linux-ip-commands-for-network-administrators/
