A virtual private network is a network configuration to safely
browse the internet without allowing
anyone to know your identity. A VPN setting can encrypt your
browsing data and hide your public IP address, DNS, and URL. You
can visit the restricted and blocked websites by using a VPN
service. A VPN service can be used over WiFi, cellular data, or
broadband internet. When you want to use a VPN service to bypass
your identity, the most confusing dilemma comes in front of you,
which VPN should you try? Which is safer than any other virtual
private network? In my opinion, the OpenVPN is one of the most used
and finest private network services to use in your Ubuntu Linux.
[1]
Working Mechanism of
OpenVPN
VPN was first created for the giant tech companies who need to
secure their data, but nowadays, the VPN services are available for
everyone. Normally your computer access the internet directly
through your internet service provider, while the VPN makes a
tunnel to establish your internet connection more secure and
private.
In that case, the virtual server access the internet on your
behalf. A VPN service is important if you want to watch content
from any streaming website with a restriction policy based on
geo-location. Despite having a few disadvantages of using a VPN
service, it is safe to use a VPN while using public WiFi.
The OpenVPN uses the cipher algorithm to make
your data private and safe. The OpenVPN can also mask your physical
location by encrypting the total channel, applying the hash
function, and implementing the encrypted handshake method. In this
post, we are going to learn how to install OpenVPN in Ubuntu Linux.
The primary key features of the OpenVPN are given below for better
visual representation. [2]
- Individual Business and Personal VPN Service
- 256-bit Encryption Method
- Open-source Software
- Crypto API Support
- OpenSSL Security to Establish Connections
- Can be Used Over almost Evey Cross-Platform
Step 1: Check Your IP
Address
Computer and other devices can get connected to the internet
through an IP (Internet Protocol) address. Your location, time
zone, and other details can be found by the IP address. A VPN hides
your IP address and mask your exact location. When you bypass the
internet traffic through a Vpn client[3], your physical address
is no longer detectable by anyone.
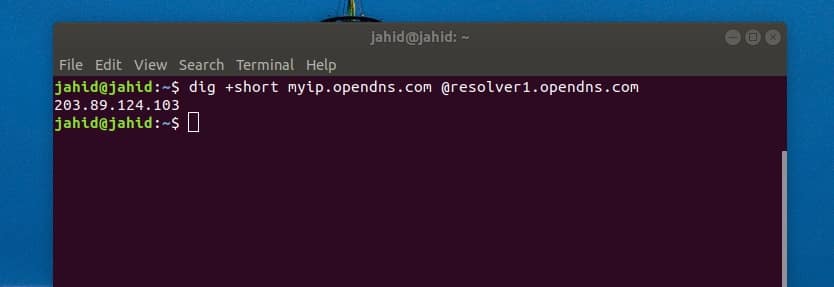
In the beginning, you should check the IP address that your ISP
gave you, next when the OpenVPN installation will be finished, you
will find a new virtual IP address. You can use the following
Domain Information Groper (DIG) command to get your IP address.
dig +short myip.opendns.com @resolver1.opendns.com
Step 2: Install OpenVPN on Ubuntu
Linux
In this step, we will see how to install the OpenVPN on our
Ubuntu Linux. We will use a cURL command in the terminal shell to
download the script file. After downloading the script file, we
will chmod command to change access permission of the script file,
then we will run a bash command to start the installation process
of OpenVPN. If you don’t have the cURL tool installed inside your
Ubuntu machine, you can use the following terminal command line to
install the cURL.
sudo apt install curl
Now, run this cURL command[4] in your terminal
shell to grab the OpenVPN installer script file. The
openvpn-install.sh file will be downloaded and stored
inside the home directory of your Ubuntu Linux.
curl -O https://raw.githubusercontent.com/angristan/openvpn-install/master/openvpn-install.sh
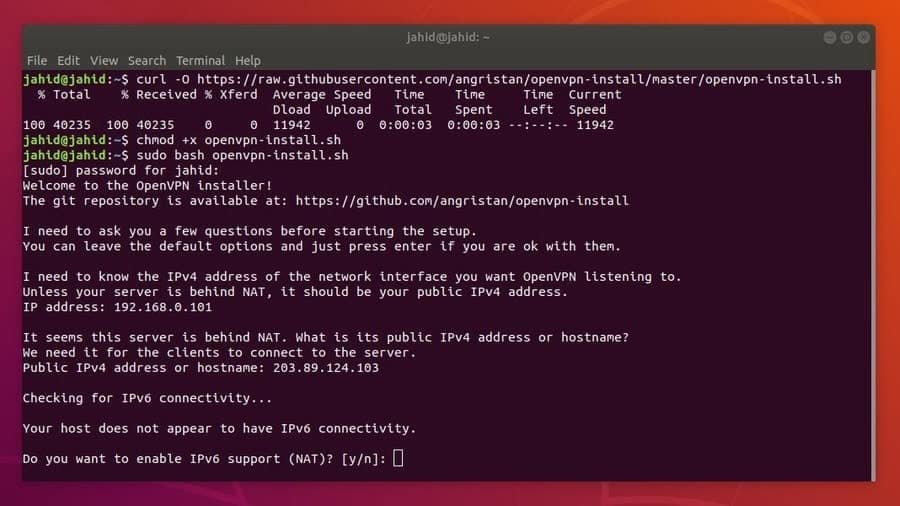
Run the chmod command and bash command one after another to
initialize the installation process of OpenVPN. In the installation
process, you will be asked to choose several options to
proceed.
If your internet connection has IPv6 support, you will be able
to choose the IPv6 configuration. You will also get options to
select port, protocol, DNS, traffic compression, and customize
encryption settings.
chmod +x openvpn-install.sh
sudo bash openvpn-install.sh
Finally, you will be asked to give the name of your VPN
connection. The VPN settings file will be saved inside the
/home/<user_name>/name.ovpn. directory. You have
to keep this file to import the OpenVPN settings in your Ubuntu
network manager settings. Note your IPv4 address, you will need
this address to import the VPN settings into the network
manager.
Step 3: Check IP and Port of
OpenVPN
A virtual private network creates a virtual IP and port to route
the traffic into a virtual server. In Ubuntu Linux, the default
OpenVPN port is 1194. You can check the listening port[5]
of OpenVPN from the terminal shell using the tupln
command.
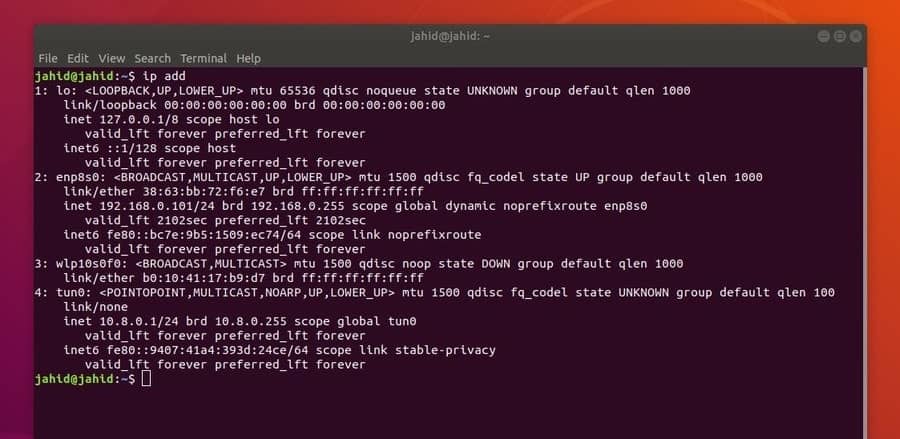
Now, to check the virtual IP address of OpenVPN, run the
terminal command given below. The virtual IP is also known as
tunnel IP. Look for the tun0 syntax to find the
virtual IP address.
sudo ss -tupln | grep openvpn
ip add
Step 4: Install the OpenVPN Client
on Ubuntu Linux
In this step, we will see how to install the OpenVPN daemon
inside Ubuntu Linux. The installation process is very
straightforward; you just need to run an apt-install
command in the Ubuntu terminal shell.
After installing the OpenVPN daemon, you must also install the
OpenVPN configuration inside the Ubuntu network manager[6]. The network manager
will be used later to establish the VPN connection. The daemon
program will allow the OpenVPN to run in the system background.
- Install the OpenVPN Daemon
sudo apt install openvpn
- Install the OpenVPN Network Manager
sudo apt install network-manager-openvpn
Step 5: Enable & Start the OpenVPN
on Ubuntu Linux
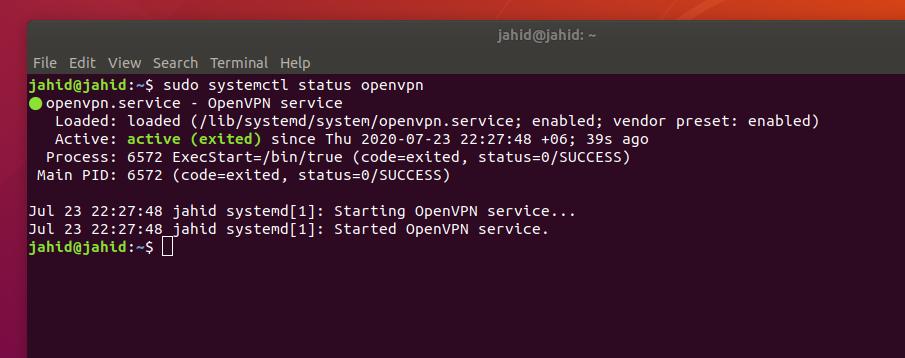
After all the installation and IP checking are done, now it’s
time to start the OpenVPN services in your Ubuntu machine. Use the
following terminal command lines to start, enable, and check the
status of the OpenVPN on your Linux machine. If you have configured
the OpenVPN correctly, you will be able to see the active status,
VPN directory, and process identification number (PID).
sudo systemctl start openvpn
sudo systemctl enble openvpn
sudo systemctl status openvpn
To stop all the running processes of OpenVPN in your Ubuntu
machine, run the following kill command in the terminal shell.
sudo killall openvpn
Step 6: Import the OpenVPN
Configuration to Network Manager
Previously we have created a file that includes the OpenVPN
settings. Now we have to import the file to the network settings
from the home directory. To import the settings, first, we have to
open the file directory using the terminal shell.
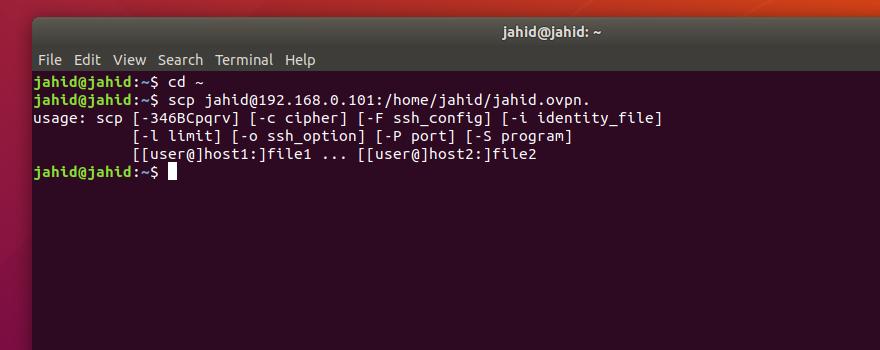
Then we will use a Secure Copy (SCP) command to copy and apply
the settings inside the VPN server form the local directory. We
have to use the specific IP address (gateway) we found earlier
while installing the OpenVPN script file.
Be careful about using the IP address; you must use your Public
IPv4 address to import the configuration settings in the network
manager. If you find any trouble to run the SCP command, make sure
that your network is not running behind any running Network address
translation (NAT) module.
cd ~
/home/jahid/ubuntupit.ovpn.
scp [email protected]
[7]:/home/jahid/jahid.ovpn.
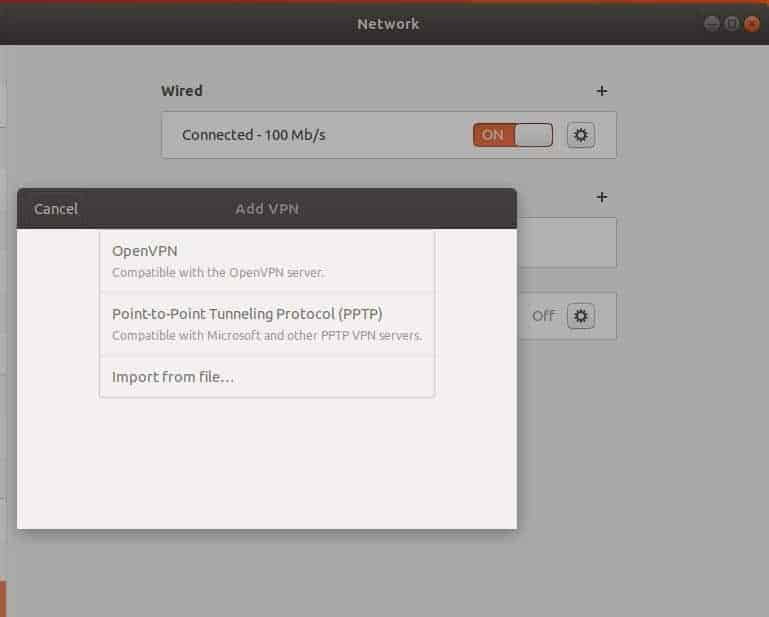
To access the OpenVPN settings from the Ubuntu Network Manager,
you need to import the OpenVPN settings inside the Network
settings. To add a VPN network in the Network Manager, we need to
Open the connectivity settings and click on the plus icon of the
VPN setting. Then we have to choose the ‘Import from
file‘ option select and import the configuration file.
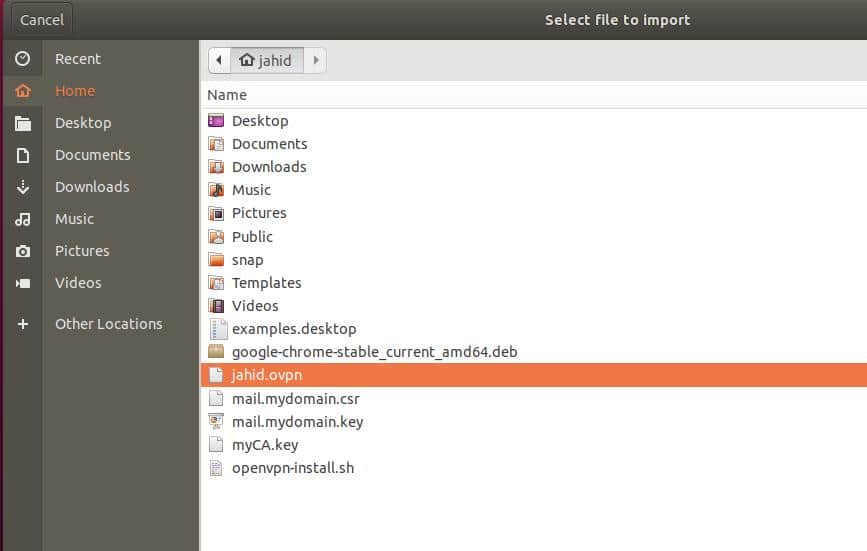
Now, select the .ovpn file from your home directory
to finalize the import process.
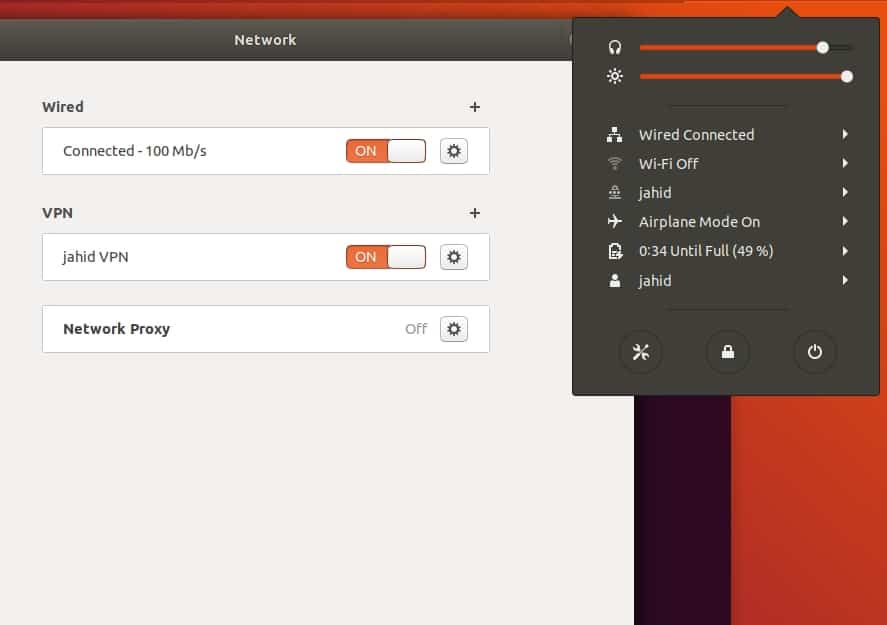
Finally, you will be able to toggle the VPN button to connect
the OpenVPN in your Ubuntu Linux. You can also connect and
disconnect the VPN service from the Ubuntu top bar.
Step 7: Firewall Settings for
OpenVPN on Ubuntu
As we all know that Ubuntu uses the UFW firewall[8]
system to manage the incoming and outgoing network traffic, so to
get an uninterrupted internet connection through the OpenVPN, we
need to configure the firewall settings for the OpenVPN.
I have mentioned earlier that the OpenVPN uses the User Datagram
Protocol (UDP), and the default port of OpenVPN is 1194. So we will
allow the port against the connection protocol.
ufw allow 1194/udp
You can also edit the firewall setting script using the Nano
editor to edit the default forward policy for OpenVPN. Open the
script and find the syntax
DEFAULT_FORWARD_POLICY, then change the value from
DROP to ACCEPT. Then save the script and
exit the file.
sudo nano /etc/default/ufw
DEFAULT_FORWARD_POLICY="ACCEPT"
Step 8: Remove OpenVPN on Ubuntu
Linux
Till now we have seen how to install and configure the OpenVPN
on Ubuntu Linux. Now we will see how to remove and clean the
OpenVPN from Ubuntu. You can use the following terminal command
lines to uninstall and delete the configuration files from your
filesystem.
sudo apt-get remove openvpn
sudo apt-get autoremove openvpn
sudo apt-get purge openvpn
sudo apt-get autoremove --purge openvpn
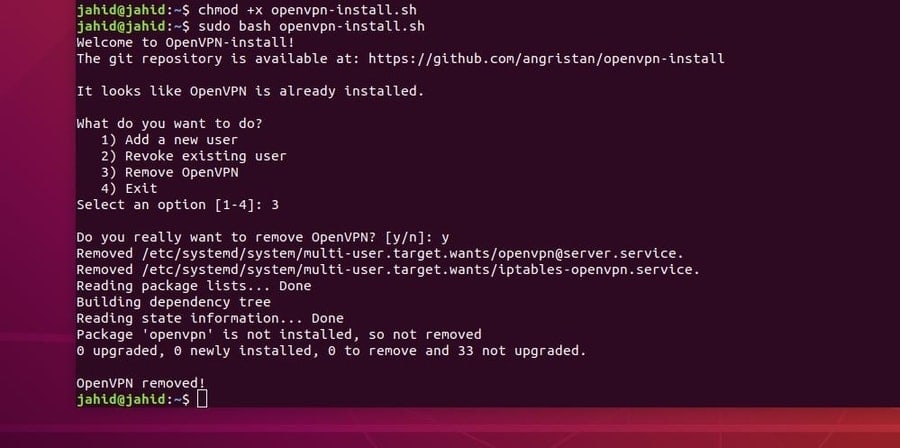
You can also try removing the OpenVPN by using the installation
bash commands[9]. Once the OpenVPN is
installed inside your machine, you can’t install it again. If you
run the installation command again, it will give you options to add
a new user, revoke existing users and remove OpenVPN from your
Ubuntu Linux machine. You can choose the ‘Remove
OpenVPN‘ option to remove the OpenVPN from your
machine.
Final Thoughts
Before installing the OpenVPN in your Ubuntu Linux, you need to
know what type of virtual private network you need? The
OpenVPN is mostly used to establish a secure shell private network
connection. If you want to use a Point-to-Point Tunneling Protocol
VPN or an Internet Protocol Security VPN, then you should give a
second thought before installing the OpenVPN in your machine.
In this post, I have described the steps of how to install and
configure the OpenVPN daemon in your Ubuntu Linux. I’ve also
explained the working method and key features of the OpenVPN. In
case you are searching for an end-to-end encrypted virtual private
network, then the OpenVPN is appropriate for you. Using a virtual
private network is totally safe and legal.
If you find this post useful and informative, please share it
with your friends and the Linux community. Let us know which VPN is
the most trustworthy to you. Write your opinions in the comment
segment.
References
- ^
13 Best
Ubuntu Web Browsers: Which One is Right for You?
(www.ubuntupit.com) - ^
cipher algorithm
(en.wikipedia.org) - ^
Top 10
Linux VPN Clients and Services For You To Get Protected
(www.ubuntupit.com) - ^
50
Useful and Productive cURL Command in Linux
(www.ubuntupit.com) - ^
listening port
(www.ubuntupit.com) - ^
Ubuntu
network manager (www.ubuntupit.com) - ^
[email protected]
(www.ubuntupit.com) - ^
UFW
firewall (www.ubuntupit.com) - ^
Top 15
Online Linux Terminal Emulators and Bash Editors
(www.ubuntupit.com)
Read more https://www.ubuntupit.com/how-to-install-openvpn-in-ubuntu-linux-a-tutorial-for-newbie/